
Only users with the ‘Full Admin’ role can access the Project Settings.
To update project settings, follow the steps below.
-
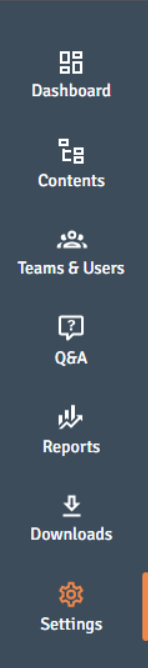
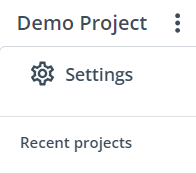
Access Settings: Navigate to the ‘Settings’ page using the left-hand menu of the project. Alternatively, click the project name in the centre of the top navigation bar and select ‘Settings’ from the dropdown menu.
-
Choose Tab: Navigate to the desired tab to make changes.

General settings
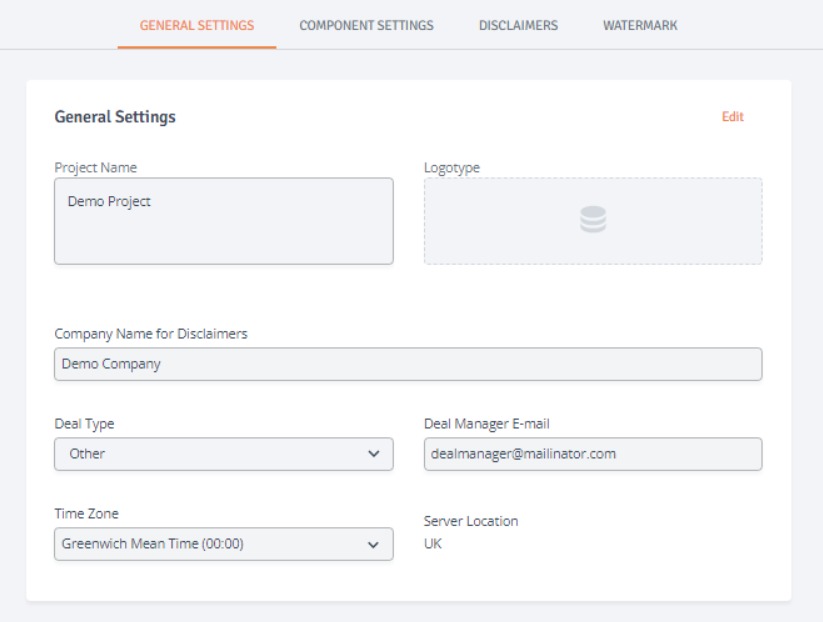
Review and update the essential information about the project.
The logo added in General Settings will appear only on the ‘Projects’ page. To update the logo within a project, please contact the Customer Services Team.
-
Access Editing: Click on ‘Edit’ located in the top right corner of this section.
-
Modify Project Details:
-
Project Name: Can be changed or updated as needed.
-
Logotype: A company logo can be uploaded to display on the 'Projects' page. For placement in the top left corner or color theme customization, contact the Customer Services Team.
-
Company Name for Disclaimers: Appears in the project Disclaimer if enabled. The disclaimer can be configured in Disclaimer Settings.
-
Deal Type: Ensures project settings are tailored to the selected deal.
-
Deal Manager Email: Another user can be nominated as Deal Manager. The user must have a Full Admin role assigned.
-
Time Zone: All project information is displayed in this time zone for all users, regardless of their individual time zones.
-
Server Location: Indicates where the project data is stored.
-
-
Save Changes: Click ‘Save’ to confirm and save your updates.
Component settings
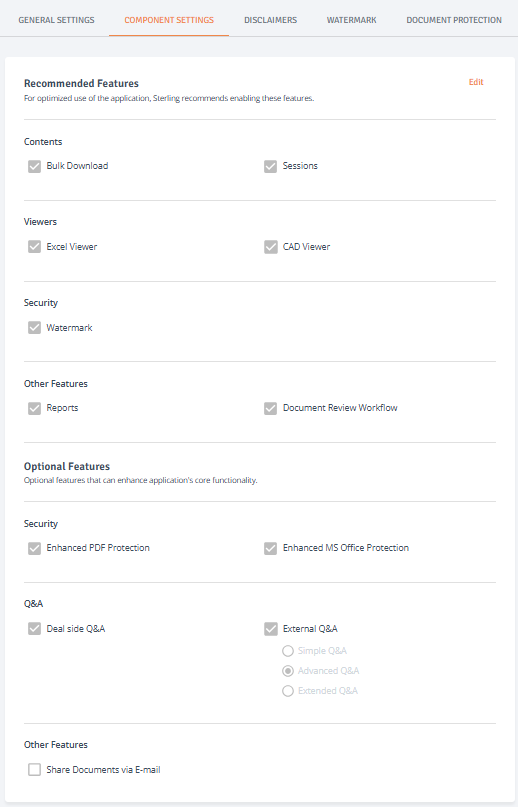
Review and update the features enabled for the project. Customize these features to meet the specific needs of the project and ensure the appropriate tools are activated.
-
Access Editing: Click on ‘Edit’ located in the top right corner of this section.
-
Modify Project Components: Disable or enable components such as:
-
Bulk Download: Enabled for all teams, allowing users with download permissions to download entire folders and their contents. If this option is disabled, files can only be downloaded individually.
-
Sessions: Provides enhanced control over changes to the index before publication. Changes are held in Sessions and are visible to users only after the Session is published.
-
Excel Viewer: Excel documents can be opened directly in the browser for a familiar viewing experience. Edits and actions are not permitted, but the content can be viewed efficiently.
-
CAD Viewer: 2D and 3D CAD files can be viewed directly in the browser, with basic navigation tools provided for easy exploration.
-
Watermark: Applicable to all documents converted to PDF or with Enhanced Protection applied, while the original native documents will remain unchanged.
-
Reports: Provides access to interactive, customizable reports for users with Full Admin and Report Manager roles, with certain reports available to specific roles, such as Content Managers and User Managers.
-
Document Review Workflow: Allows internal teams to assign documents for review and feedback in an efficient workflow.
-
Enhanced PDF Protection: Applies DRM (Digital Rights Management) to PDF documents, controlling access and preventing unauthorised sharing, copying, or printing to protect sensitive content.
-
Enhanced MS Office Protection: Uses IRM (Information Rights Management) to control access and usage of MS Office files, with the ability to revoke permissions even after the files have been shared.
-
Deal Side Q&A: Allows smooth question-and-answer exchanges within internal teams for efficient collaboration.
-
External Q&A: Enables seamless Q&A between External and Internal teams, with External users limited to asking questions and Internal users providing answers. Three workflow options are available: Simple, Advanced, and Extended.
-
Document Review Workflow: Enables internal teams to assign documents for review and feedback in an efficient workflow.
-
-
Save Changes: Click ‘Save’ to confirm and save your updates.
Disclaimers
Disclaimers provide clarity on data accuracy, confidentiality, and non-binding terms, safeguarding both contributors and users within the project.
Disclaimers that are currently assigned to any Team Type cannot be deleted.
-
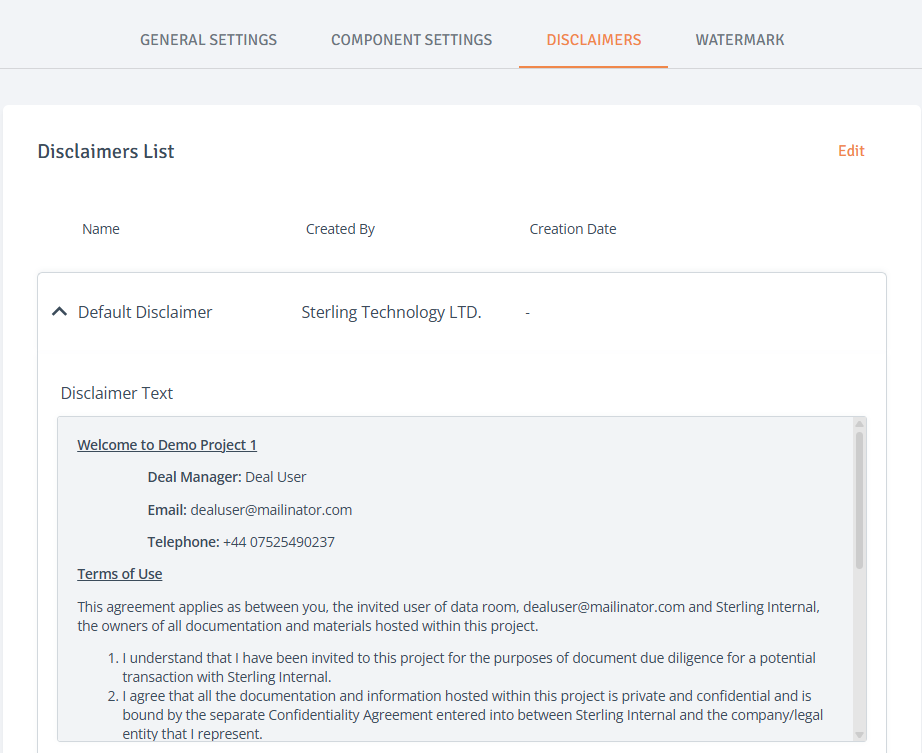
Disclaimers List: In this section, you can view Default Disclaimer, which cannot be edited, or choose to add/delete custom disclaimers.
-
Access Editing: Click on ‘Edit’ located in the top right corner of this section.
-
Add Disclaimer: Click on ‘Add Disclaimer’ located in the top right corner of this section. Enter Disclaimer Name and edit disclaimer text if needed.
-
Delete Disclaimer: Navigate to the disclaimer that you wish to delete and click ‘Delete’.
-
-
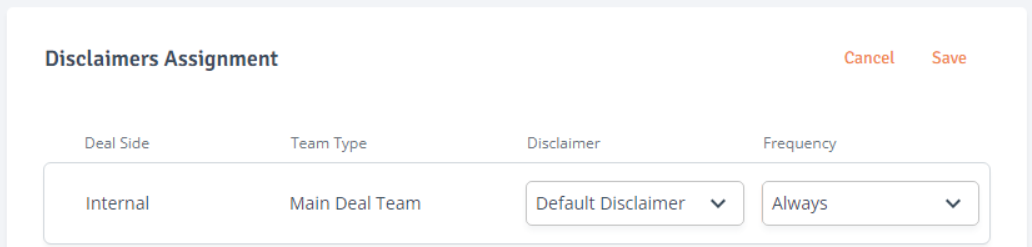
Disclaimers Assignment: In this section, you select the type and the frequency of the disclaimer for specific team type.
-
Access Editing: Click on ‘Edit’ located in the top right corner of this section.
-
Modify Settings: Navigate to the Team Type that you would like to update and select disclaimer and the frequency from the dropdowns.
-
Save Changes: Click ‘Save’ to confirm and save your updates.
-
Watermark
Watermarks do not apply to CAD or video files.
To access the Watermark tab, this feature must be enabled in the Project's Component Settings.
The watermark feature allows an image to be added to a document to indicate ownership and help prevent unauthorised copying.
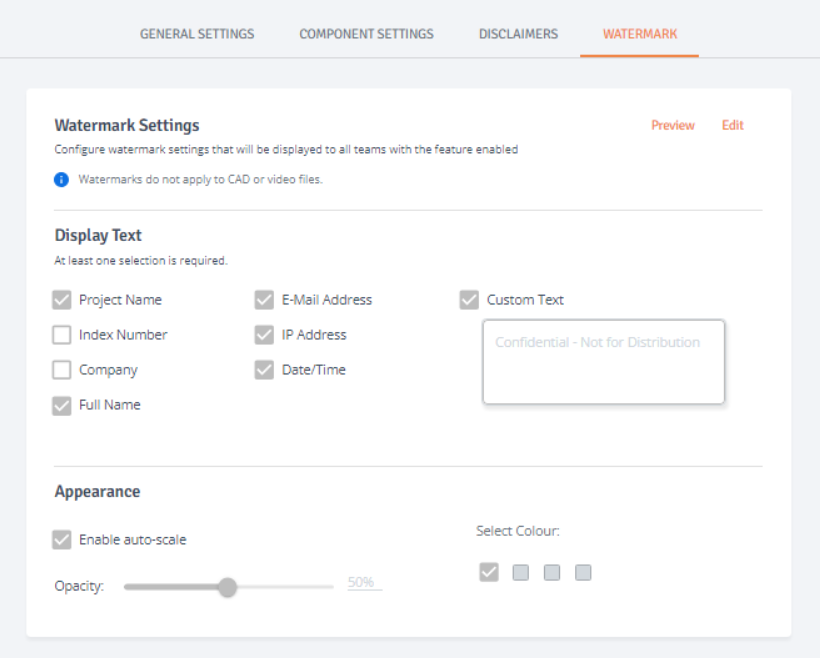
Configure watermark settings that will be displayed to all teams with the feature enabled.
-
Access Watermark Settings: Click on ‘Edit’ located in the top right corner of this section.
-
Customise Watermark Text: Customise the display text and select which information appears on the watermark, including Project Name, Index Number, Company, Full Name, E-mail Address, IP Address, and Date/Time.
-
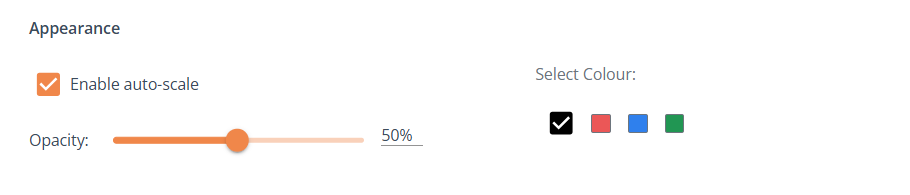
Customise Watermark Appearance: Select the opacity and colour of the watermark text. Auto-scale can also be disabled, allowing manual selection of the font size.
-
Save Changes: Click ‘Save’ to confirm and save your updates.
-
Access Preview: Click ‘Preview’ located in the top right corner of this section.
-
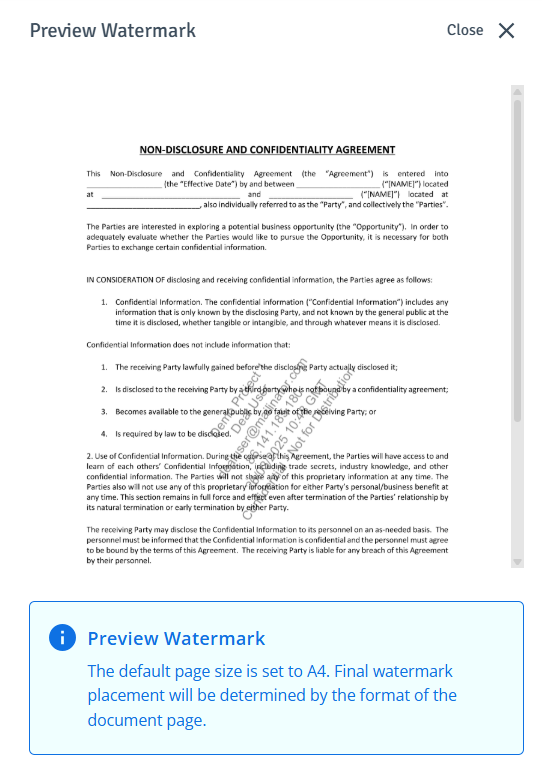
Watermark Preview: The drawer opens on the right side, providing a preview of the Project's watermark on the default A4 page size.
Document protection
To access the Document Protection tab, this feature must be enabled in the Project's Component Settings.
Document Protection settings control document usage, such as limiting viewing, printing, or copying, to ensure compliance with licensing agreements and prevent unauthorised use.
These settings apply to all teams by default unless modified in Permissions.
Changes applied in this section will not override any existing custom team settings.
To apply document protection, follow the steps below.
-
Access Editing: Click on ‘Edit’ located in the top right corner of this section.
-
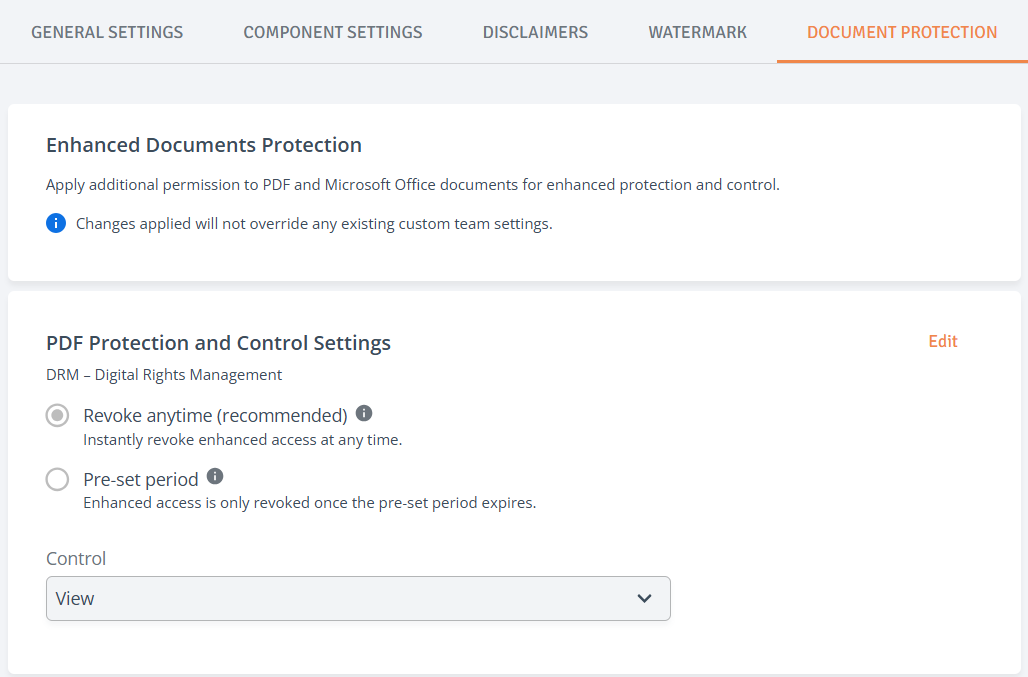
PDF Protection and Control Settings: Choose from two setting types.
-
Setting type:
-
Revoke anytime (recommended): Revoke access instantly at any time.
Access is revoked immediately when the project is terminated, user access changes, or a file is deleted. To maintain offline access, users must sign in online at least once every 24 hours. -
Pre-set period: Set a period for when access expires.
The pre-set period starts once a user downloads and opens the document online, allowing offline viewing until the set period ends.
-
-
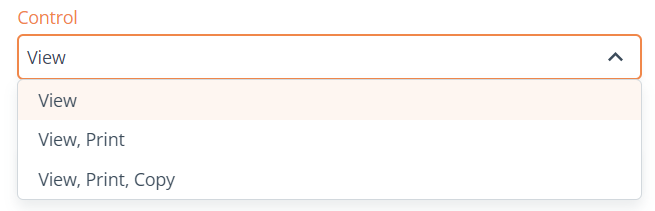
Control: Set control options (applicable to Revoke Anytime and Pre-Set Period):
-
View: Users can download and view a watermarked copy, which will automatically expire after the specified number of days.
-
View, Print: Users can download, view and print a watermarked copy, which will automatically expire after the specified number of days.
-
View, Print, Copy: Users can download, view, print and copy a watermarked copy, which will automatically expire after the specified number of days.
-
-
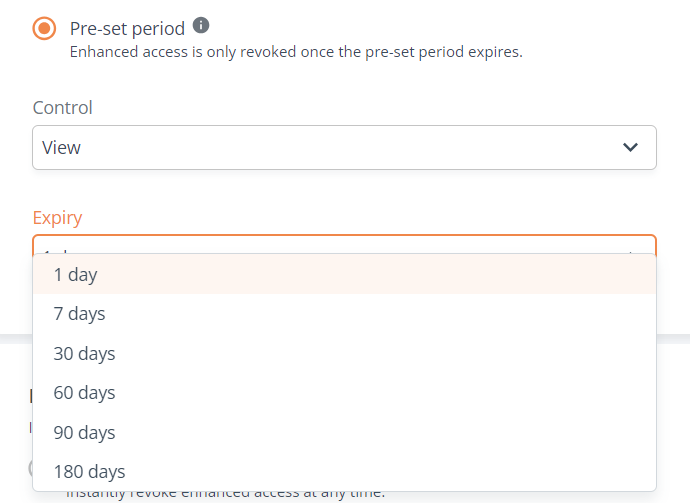
Expiry: Set control options (applicable to Pre-Set Period):
-
-
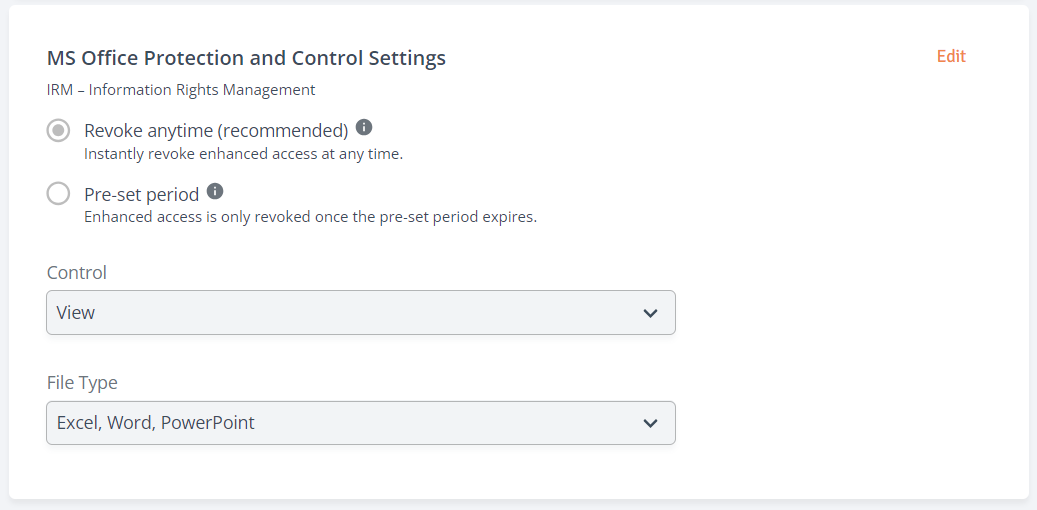
MS Office Protection and Control Settings: Choose from two setting types.
-
Setting type:
-
Revoke anytime (recommended): Revoke access instantly at any time.
Access is revoked immediately when the project is terminated, user access changes, or a file is deleted. To maintain offline access, users must sign in online at least once every 24 hours. -
Pre-set period: Set a period for when access expires.
The pre-set period starts once a user downloads and opens the document online, allowing offline viewing until the set period ends.
-
-
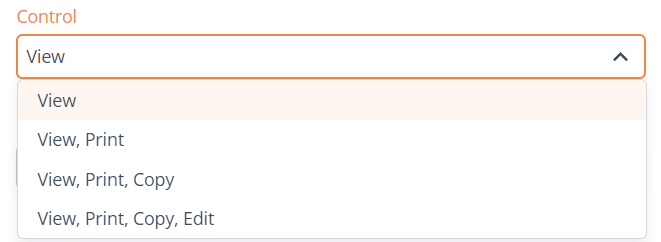
Control: Set control options (applicable to Revoke Anytime and Pre-Set Period):
-
View: Users can download and view a watermarked copy, which will automatically expire after the specified number of days.
-
View, Print: Users can download, view and print a watermarked copy, which will automatically expire after the specified number of days.
-
View, Print, Copy: Users can download, view, print and copy a watermarked copy, which will automatically expire after the specified number of days.
-
View, Print, Copy, Edit: Users can download, view, print and copy a watermarked copy, which will automatically expire after the specified number of days. Users can execute formulas in Excel files and edit documents to create new versions.
-
-
Expiry: Set control options (applicable to Pre-Set Period):
-
1/7/30/60/90/180 days
-
-
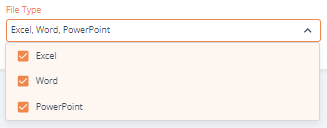
File Type: Select File Type from the ‘File Type’ dropdown.
-
Excel, Word, PowerPoint
-
Select the pre-set period from the Expiry dropdown.
1/7/30/60/90/180 days
-
-
-
Save Changes: Click ‘Save’ to confirm and save your updates.