
To access the Document Protection tab, this feature must be enabled in the Project's Component Settings.
Document Protection settings apply only to documents with ‘View’ or ‘Print’ content permissions.
Document Protection settings do not affect documents with ‘Download’ content permission, which always provides access to the original, unprotected native file.
To set up additional document protection, follow the steps below.
PDF protection
Apply additional permission to PDF documents on the Team level for enhanced protection and control.
Other users will be locked from editing until your changes are saved.
To apply document protection, follow the steps below.
-
Teams & Users Page: Navigate to the ‘Teams & Users’ page from the left side panel.
-
Open Document Security: At the top right of the Teams & Users page, click ‘Document Security’ to open the Document Security tabs.

-
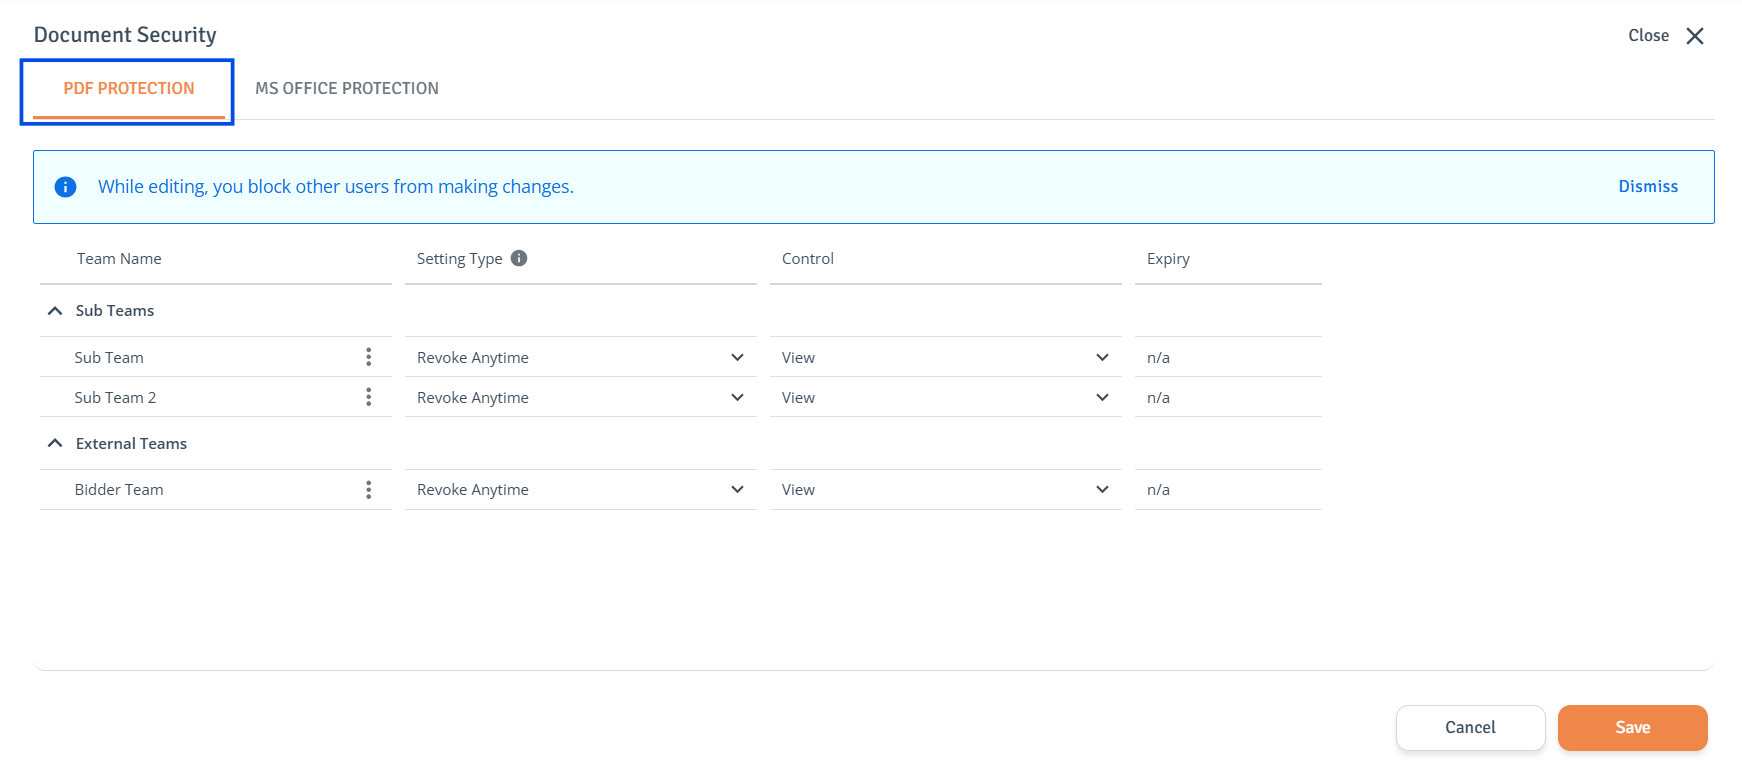
PDF Protection: By default, the page opens with the ‘PDF Protection’ tab displayed.
-
Locate Team: In the ‘Team Name’ column on the left, find the teams you want to set permissions for.
-
Set Permissions: Use table columns to set permissions.
-
Setting Type: Use this column to define which setting applies to a team:
-
Revoke Anytime: Revoke access instantly at any time.
Access is revoked immediately when the project is terminated, user access changes, or a file is deleted. To maintain offline access, users must sign in online at least once every 24 hours. -
Pre-Set Period: Set a period for when access expires.
The pre-set period starts once a user downloads and opens the document online, allowing offline viewing until the set period ends. -
Disabled: Enhanced security is off.
-
-
Control: Use this column to set control options (applicable to Revoke Anytime and Pre-Set Period):
-
View: Users can download and view a watermarked copy, which will automatically expire after the specified number of days.
-
View, Print: Users can download, view and print a watermarked copy, which will automatically expire after the specified number of days.
-
View, Print, Copy: Users can download, view, print and copy a watermarked copy, which will automatically expire after the specified number of days.
-
-
Expiry: Use this column to set expiry for the access (applicable to Pre-Set Period):
-
1/7/30/60/90/180 days
-
-
-
Save: Click ‘Save’ to confirm and save the updates.
MS Office protection
Apply additional permission to Microsoft Office documents on the Team level for enhanced protection and control.
Microsoft IRM is not currently supported in Office applications on Apple macOS or iOS devices.
Other users will be locked from editing until your changes are saved.
To apply document protection, follow the steps below.
-
Teams & Users Page: Navigate to the ‘Teams & Users’ page from the left side panel.
-
Open Document Security: At the top right of the Teams & Users page, click ‘Document Security’ to open the Document Security tabs.
-
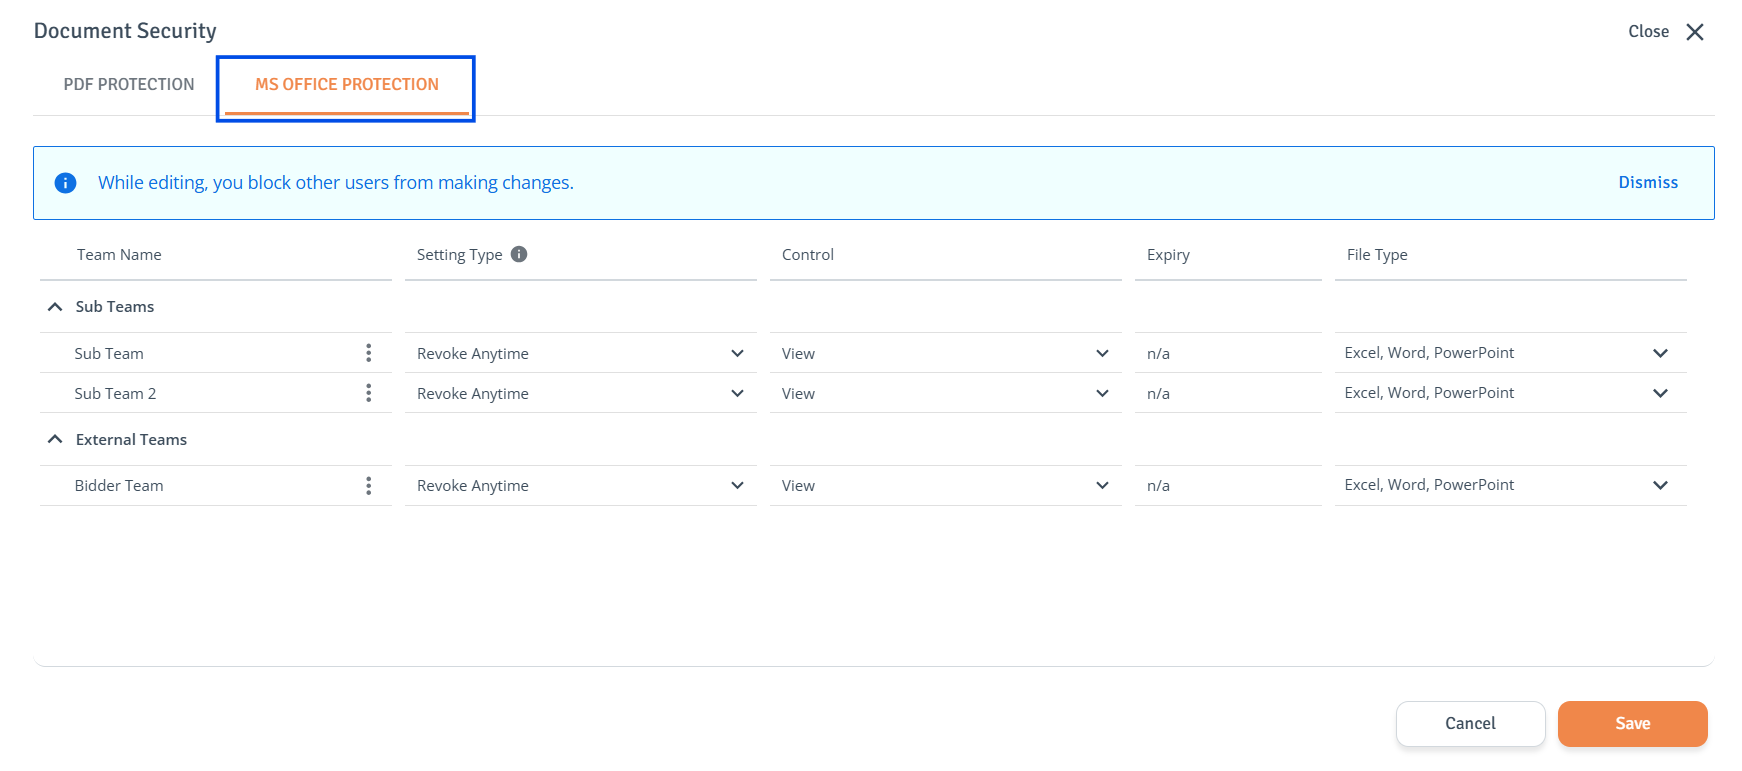
MS Office Protection: At the top of the table, navigate to the ‘MS Office Protection’ tab.
-
Locate Team: In the ‘Team Name’ column on the left, find the teams you want to set permissions for.
-
Set Permissions: Use table columns to set permissions.
-
Setting Type: Use this column to define which setting applies to a team:
-
Revoke Anytime: Revoke access instantly at any time.
Access is revoked immediately when the project is terminated, user access changes, or a file is deleted. To maintain offline access, users must sign in online at least once every 24 hours. -
Pre-Set Period: Set a period for when access expires.
The pre-set period starts once a user downloads and opens the document online, allowing offline viewing until the set period ends. -
Disabled: Enhanced security is off.
-
-
Control: Use this column to set control options (applicable to Revoke Anytime and Pre-Set Period):
-
View: Users can download and view a watermarked copy, which will automatically expire after the specified number of days.
-
View, Print: Users can download, view and print a watermarked copy, which will automatically expire after the specified number of days.
-
View, Print, Copy: Users can download, view, print and copy a watermarked copy, which will automatically expire after the specified number of days.
-
View, Print, Copy, Edit: Users can download, view, print and copy a watermarked copy, which will automatically expire after the specified number of days. Users can execute formulas in Excel files and edit documents to create new versions.
-
-
Expiry: Use this column to set expiry for the access (applicable to Pre-Set Period):
-
1/7/30/60/90/180 days
-
-
File Type: Select File Type from the ‘File Type’ dropdown.
-
Excel, Word, PowerPoint
-
-
-
Save Changes: Click ‘Save’ to confirm and save the updates.
Open MS Office protected files
Access to IRM files requires a Sterling username and password. To open MS Office protected files, follow the steps below:
-
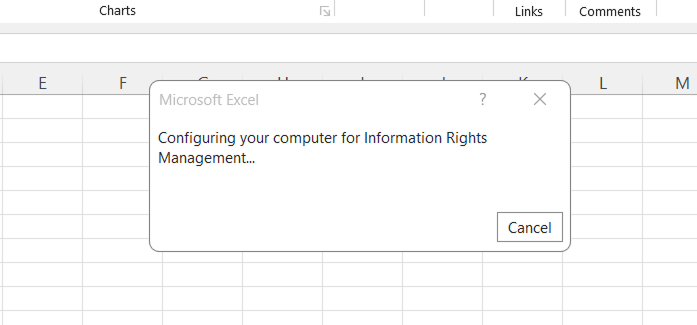
Locate the file: Click the file to open it. The platform will initiate communication with the servers.
-
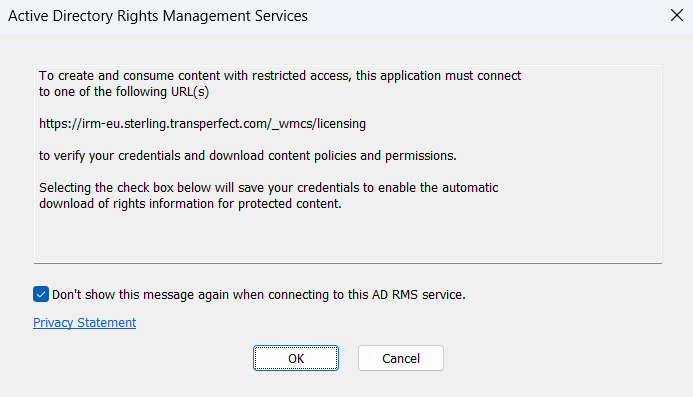
Modal: ‘Active Directory Rights Management Services' modal will appear, select 'OK’ to allow the platform to connect to Microsoft.
Select ‘Don’t show this message again when connecting to this AD RMS service’ to prevent future prompts.
-
View file: The file opens in its native format and, depending on assigned permissions, can be viewed or printed.
IRM troubleshooting for MS Office files
If the server connection fails, the following error message will appear:
-
Error Message: ‘The service at https://*.sterling.transperfect.com/_wmcs/licensing is temporarily unavailable. Ensure that you have connectivity to this server. This error could be caused because you are offline, your proxy settings are preventing your connection, or you are experiencing intermittent network issues’.
-
Solution: To resolve this issue, please add the following URLs to your browser's trusted sites:
https://*.sterling.transperfect.com/
See Add Sterling URL to your browser's trusted sites for more information.
Copy protection settings
To copy document protection settings from one team to another or to all teams, follow the steps below.
-
Teams & Users Page: Navigate to the ‘Teams & Users’ page from the left side panel.
-
Open Document Security: At the top right of the Teams & Users page, click ‘Document Security’ to open the Document Security tabs.
-
Protection Settings: At the top of the table, navigate to the ‘PDF Protection’ or ‘MS Office Protection’ tab.
-
Copy and paste to one team:
-
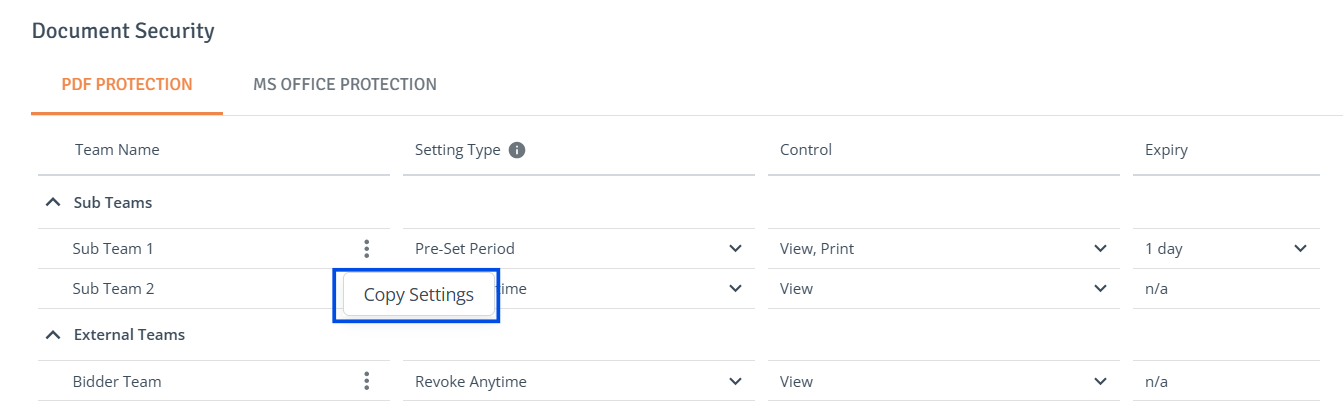
Copy Settings: In the ‘Team Name’ column on the left, select the team to copy settings from, click the three-dot menu, and choose ‘Copy Settings’.
-
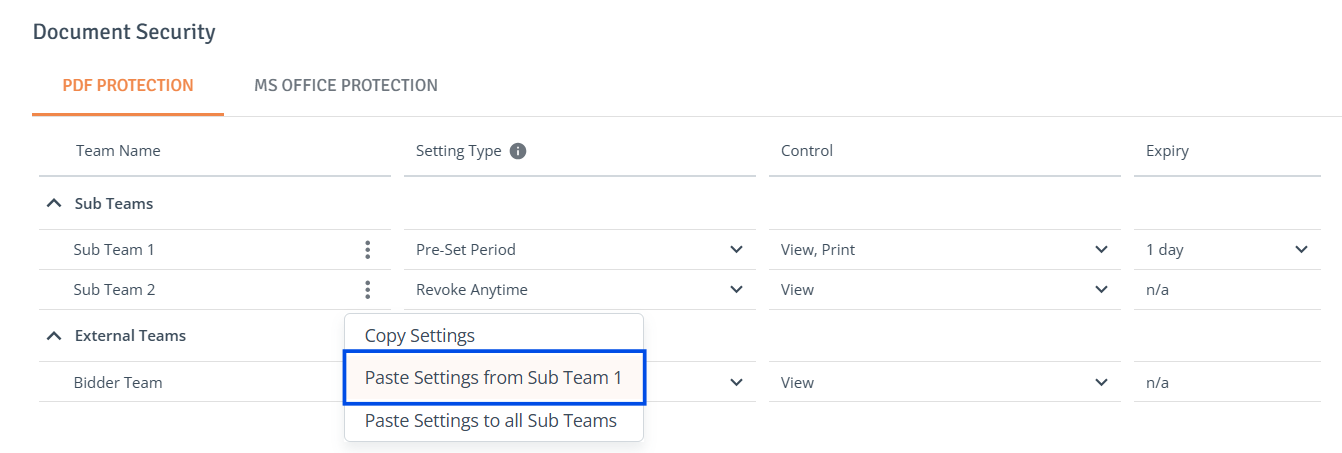
Paste Settings: Click on the three-dot menu of the destination team, then select ‘Paste Settings from [team name]’.
-
-
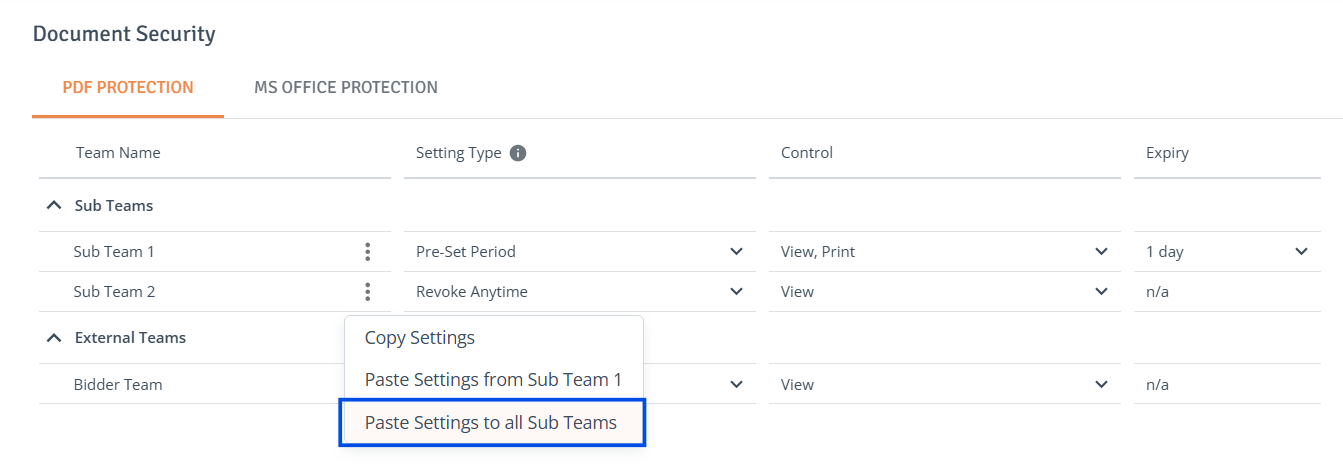
Paste to all teams: Copied settings from a specific team can also be applied to all teams of the same type. For example, settings from one External team to all External teams, or settings from one Internal Sub team to all Internal Sub teams.
-
Copy Settings: In the ‘Team Name’ column on the left, select the team to copy settings from, click the three-dot menu, and choose ‘Copy Settings’.
-
Paste Settings: Click on the three-dot menu of any destination team, then select ‘Paste Settings to all Sub Teams’ or ‘Paste Settings to all External Teams’.
-
-
Review Changes: Changes will be highlighted to indicate edited settings for that item.
-
Save Changes: When ready, click ‘Save’ to save the changes.